Easy Fenceline Feeder
Sheep Home
Shetland Sheep
Sheep Color Genetics
Sheep Health Issues
Sheep Resources
We've spent a lot of time and money since buying our first sheep, searching for methods to feed hay (our pastures are under three feet or more of snow for at least four months of the year) to them without either wasting hay or ruining their wool with too much vegetable matter. Various solutions we've tried have not worked more than a year or so, for various reasons. This is try number...four maybe? So far it looks promising. The basic concept is nothing new: Create a feeder you can fill with hay without entering the pen with the sheep, so they don't get still more hay in their wool while you feed them; a feeder which doesn't let hay shower down on them as they eat; a feeder that keeps the hay in it until it's eaten. What makes this one nice is it's cheap and easily built with things you may already have on hand. With no further ado, here's some pictures of our fenceline feeders and an explanation of how they were built. The term 'back' of the feeder refers to the section outside the fence, where you will feed from. The 'front' of the feeder is where the sheep eat. |
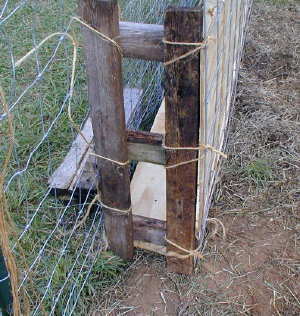
 An end view of one feeder |
Materials list for one 16-foot feeder
(handles about 14 Shetland sheep with ease):
- 16 feet of sturdy, permanent fencing. This can be regular high-tensile woven wire, or it can be a cattle panel fastened to fence posts.
- one cattle panel--you can use a combo panel if needed, just turn it so the wide meshes are at the bottom.
- Some sort of barriers to keep hay from going through the panel and fencing where you don't want it to--we used chicken wire we had on hand for the back side of the feeder, panels of plywood on the inside next to the sheep. One 4 x 8 foot panel of plywood will make the barrier for the front portion of the feeder--better yet, use 2 panels, and cut a 1 foot strip off one 8 foot side to make the bottom spacer (see next item), leaving you with a 3 foot section next to the sheep.
- A strip of wood, plywood, particle board, or some other item a minimum of 6 inches wide (less than that won't hold much hay where the animals eat), maximum of 12 inches wide (wider than that and they won't be able to reach the food at the back side of the feeder). This acts as a spacer to keep the bottom of the feeder wide enough to hold hay easily, it keeps food off the ground, and, if given sides to make a tray, can be a place to feed grain (making sure the sides are high enough to keep grain from ricocheting off the tray when poured in).
- If using plywood or particle board, or any other substance that will be ruined by too much moisture, you'll need 6 pieces of 2 x 4 the depth of your bottom spacer, to raise it off the ground.
- Spare pieces of 2 x 4 to make spacers at the top of the feeder, and to make frameworks to block the open ends of the feeder so the sheep can't get in (not needed if both sides of your feeder end against more fence, or your feeder is built outside the fencing).
- Baling twine or other sturdy cording for tieing things together.
| Back to Top |
General siting considerations:
- If possible, build the feeder on the outside of your fenceline, so the cattle panel can lean away from the sheep, and the sheep stick their heads through the fence to feed. This will prevent even more hay from falling into the wool, and you won't have to build sides for your feeders to keep sheep out of them, or spacers to keep the top wide open for loading hay.
- Avoid building feeders in inside corners if possible--makes it harder to build, and harder for the sheep to eat the hay in the corner.
- What's your prevailing wind during the winter? If the wind blows toward you, rather than toward your sheep, you avoid still more hay in the wool.
Step by Step Instructions:
| Part 1 | |
|---|---|
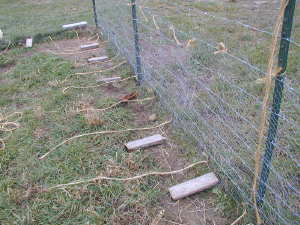 |
|
| Part 2: | |
|---|---|
|
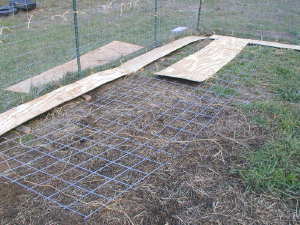 |
 | |
| Back to Top |
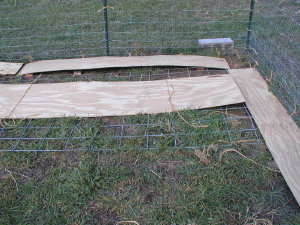
| Part 3: | |
|---|---|
 |
|
| Part 4: | |
|---|---|
|
 |
| Part 5: | |
|---|---|
 |
|
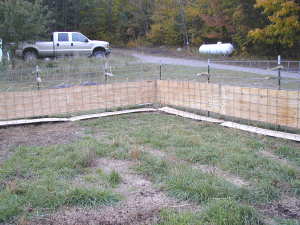
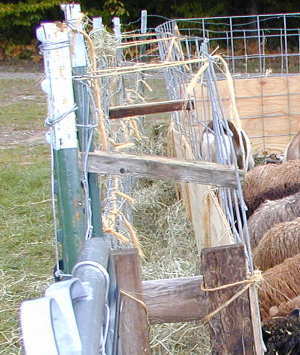
| Ready to Use: | 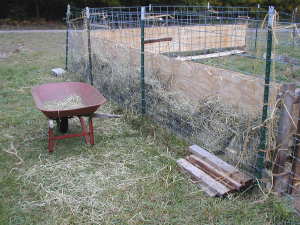 | |
|---|---|---|
This final picture shows the feeder loaded with hay and ready to use. Each 16 foot section will easily hold 120 pounds or more of hay. |
||
| Back to Top |
Final Thoughts
We're not sure whether this feeder will save much hay over feeding on the ground. So far, there seems to be lots of waste. However, we have two goats who delight in spooking the sheep from their feed, and our hay is very stemmy this year--so it's possible no feeder would prevent much waste. If we can ever figure out how to feed the goats and llama completely separately from the sheep, we'll see if that helps.
What we are sure of is this feeder will be much easier to use. In the winter, Holly must pull bales of hay from the hay barn 200 feet away, through powdery snow. Not having to enter the winter paddock, go through the barn, keep sheep from escaping, keep sheep from attacking the bale, and then find a way to distribute flakes without hay going all over everything, or shove a too-large bale into a too-small feeder, is bound to be a major savings of time, effort, and hay, and most importantly, wool quality.
Another nice factor is this feeder is modular. As long as you have 16 feet of fenceline, you can build another feeder. We have one in the ram pen and two in the ewes' paddock, so we can comfortably feed our current flock size (about 40 Shetlands, a BL, two goats, and a llama) for up to three days without reloading feeders if we needed to.
We strongly recommend building the feeder on the outside of the fence instead of the inside. We couldn't do that because our fence abuts on a parking area on one side, and a lane for trucks and other vehicles to have access to our farm on the other side. We can't take any more space from those areas.
Because we built two feeders coming together at an inside corner, we couldn't slant the cattle panel. We recommend positioning your feeder so you can slant the panel at about a 40 degree angle (preferably to the outside) for easiest loading with hay.
All in all, a great day's work!
| Site Map | Back to Top | Contact Us | Our Guarantee | Feedback |